Pest Control Treatment Prep Instructions
Fumes R Us will be treating your home utilizing a variety of methods and or products. To ensure the safety and success of your treatment, we ask that you read the following instructions.
Kitchen Treatment For Pantry Pests, Roaches and Ants

- Remove food from the cupboards, cabinets, and under the sink.
- Place the food items on your dining room table, away from treatment site.
- Let the technician know where you have noticed the pests’ trails or heaviest insect activity at.
- Payment is due at the time of service.
- You will need to vacate for 2 hours. Pets and people can return once the area treated is dry.
- It may be necessary for the pest technician to remove pictures from the walls because roaches often lay their eggs and also hide behind picture frames. We may have to sit the frames on the floor to dry.
- For roaches and ant infestations, remove the items from under the bathroom sinks as well.
- Upon returning, do not attempt to wash down treated surfaces. Only clean off areas which are considered food preparation surfaces.

- You may still see insects after the treatment; the chemical affects their nervous system, so there may be more pests initially or dead pests surfacing days later. Do not attempt to spray any live stragglers with over the counter sprays, as this may affect the quality of your treatment. If you still experience pests one week after treatment, call our office to discuss what needs to be done.
- Post treatment, keep all food sealed in plastic bags or plastic containers.
- Keep pet food out of reach of pests and preferably seal up in a pest resistant container after your pet has eaten.
- Try and keep clutter away from previously infested sites (this attracts insects).
Flea Treatment Inside & Outside
- Water your grass the day before treatment but preferably not the day of treatment (skip a day or two if possible).
- Cut grass regularly to avoid pest harborage sites.
- Dry sweep your concrete walk ways for a day or two, instead of hosing down these areas.
- Have your pets treated for fleas the same day that you schedule your flea spraying. Wash pet bedding in hot water or dispose of bedding on the same day of treatment.
- Remove any toys or other loose articles on the floor inside your home.
- Vacuum carpets and hard floor surfaces, prior to the technician arriving and dispose of the vacuum bag.
- Make every room accessible for the technician to spray.
- Allow 2 hours of aeration prior to re-entry.
- Upon returning to your residence, vacuum the hard floor and carpeted areas of your home once again. This will cause any embryos that may be ready to hatch to be trapped in the vacuum. Dispose of the vacuum bag or empty and wash canister.
- An insect growth regulator is used to prevent embryos from developing into biting adults. However, if you have a heavy flea infestation caused by neighboring pets or others conditions that require regular treatments to your home, we advise you discuss an annual flea regimen with your technician.
Ant Treatment & Other Crawling Insects Inside & Outside
- Remove any items in your kitchen cabinets or under kitchen sink if you are having infestations in these areas or would like a prevention treatment as well.
- Discuss with your technician where you are seeing the ant trails.
- Baseboards and cracks and crevices will be treated, so make sure you pick up any loose articles.
- Make every room accessible for the technician to treat because the best treatment will require a barrier application.
- Expect a few straggler ants or scout ants post treatment. If you still see an infestation (more than a few) one week after treatment, call to discuss with our staff.
- The perimeter of your property line and most likely the outside walls of your home will be sprayed, so please keep pets away until dry (2 hours). Open any gates, store rooms, or other areas that need to be treated and accessed.
- Your technician will let you know if it’s necessary to treat the crawl space of your home, based on the construction type and target pest.
- Avoid hosing down your concrete walk ways (dry sweep for a week) if possible.
- Remove any clutter around the perimeter of the outside of your home.
- Avoid storing firewood or if needed, then store far away from house.
- Try to keep plants and bushes trimmed back so that they are not touching the house. This includes tree limbs.
- Do not over water; heavy moisture conditions are conducive to pests.
- Keep your grass trimmed to avoid pet harborage.
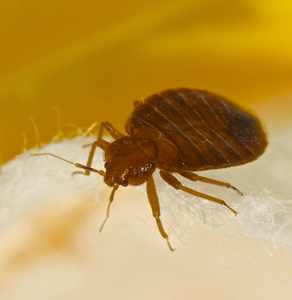
Bed Bug Treatment – Pre and Post Prep

- Wash all clothing in hot water and dry on high heat setting
- Keep all clothing sealed in plastic bags until the initial treatment and the follow-up treatment is completed (approx. 2 weeks). You can take clothes out and use them as needed, but seal up bag again.
- Remove sheets from bed(s) and wash in hot water and dry on high heat setting. Leave bed(s) stripped for technician to treat.
- Remove any items from underneath the bed(s).
- Purchase the mattress covers for bed bugs and put on after treatment.
- Turn off fish tank pump and cover fish with a sheet or remove from tank for treatment if you require a heavy application (discuss with technician prior to schedule date).
- You may find the couch cushions or throw pillows out of order when you return due to our technician having to move them around for our treatment.
- Vacuum all carpets and hard surface areas and dispose of the vacuum bag prior to treatment.
- You will need to vacate for 2 hours.
- You may still see bed bugs until the full process is complete. And even then, bed bugs may be left behind in an article of clothing or other personal belonging, which means that multiple treatments may be necessary.
- Schedule your follow up inspection & treatment for two weeks after your initial treatment.
Spider Treatment Inside & Outside
- Most successful spider treatments are accomplished by first removing all accessible webbing and spraying the nest sites with a residual pesticide.
- Some spiders nest in crawl spaces. If your home is constructed on a raised foundation, it may be necessary to treat these areas. Your technician will advise.
- Garages harbor spiders around door frames, in the corners of the walls, behind appliances, and between exposed stud walls. Please make the garage accessible for treatment.
- Bushes and plants may need to be sprayed as well.
- Due to the physical characteristics of spiders, it may be necessary to re-treat your home if you are still experiencing an infestation weeks later.
- You can deter spiders from nesting by knocking down any new webs, post treatment.
- Spider infestations are often a sign of another pest infestation in or around your home. Discuss a treatment plan for all crawling insects with your pest technician.
Call our office for further instructions on your pest treatment.
Frequently Asked Questions
How much fumigant should be applied to my home?
This can only be determined by the fumigator, as factors such as target pest, exposure time, seal of the structure, weather conditions, temperature etc... will be calculated in order to figure the total amount of gas to be used.
Read MoreTermite Facts

There are many species of structural infesting termites and each one has developed effective ways to get at and attack the wood in your home. Preventing termite attack and killing these...
Read More
